Boost Your Git Game: Master Productivity with Alfred Snippets
Table of Contents
In my previous blog post, I introduced Alfred and how to boost developer productivity by using a systematic approach to your bookmarks, leveraging Alfred’s full text search to streamline your workflow. Continuing on the same topic of developer productivity, today we’ll cover Alfred snippets – I’m loving this app so much!
The Need for Speed in Development
As a productive developer, you need to be able to switch context quickly. Whether it’s reviewing a PR, fixing your own PR after a peer leaves comments, or jumping between tasks, efficiency is key. Good developers should apply pull request best practices: keeping PRs small, consistent, ordered, and frequent. These practices demand proficient handling of Git, including rebasing branches and switching efficiently.
Furthermore, as a good developer, you should be able to tell a story through your commits. Well-explained, clear comments, and chronological order make your commit history understandable and maintainable. This is yet another reason to master your Git abilities.
Unleashing the Power of Alfred Snippets
Alright, enough context, let’s dive into the meat of this blogpost: Alfred snippets, becoming a Git-ninja! 🥷
What are Alfred Snippets?
Alfred snippets are predefined text blocks that you set up beforehand and can quickly insert into any application or text field. This concept, sometimes called text augmentation, allows you to create shortcuts for frequently used text, commands, or code.
For example:
"~cur" ------- becomes ----> "git branch --show-current | pbcopy;"Versatility of Alfred Snippets
You can use Alfred snippets for virtually anything: email templates, frequent responses, code snippets, URLs, and of course, Git commands. Additionally, it can access your clipboard and perform other cool tricks, further enhancing your productivity.
Setting Up Alfred Snippets for Git
The setup is pretty straightforward: open Alfred preferences, navigate to ‘Snippets,’ and start creating your Git command snippets. You set up the “prefix” once when creating the collection, and it will automatically apply to each keyword.
- Name: The identifiable name of the snippet.
- Keyword: The combination of letters and symbols that will trigger the text replacement. It’s highly recommended to set the “prefix” as a symbol to avoid accidental triggers.
- Snippet: The target text/snippet that will be inserted.
My personal setup
This is what I’ve found useful for my current project. Bear in mind that this setup is dynamic and you’ll likely need to update it periodically to get the most out of the tool.
Here are my personal favourites and the workflows in which I use them:
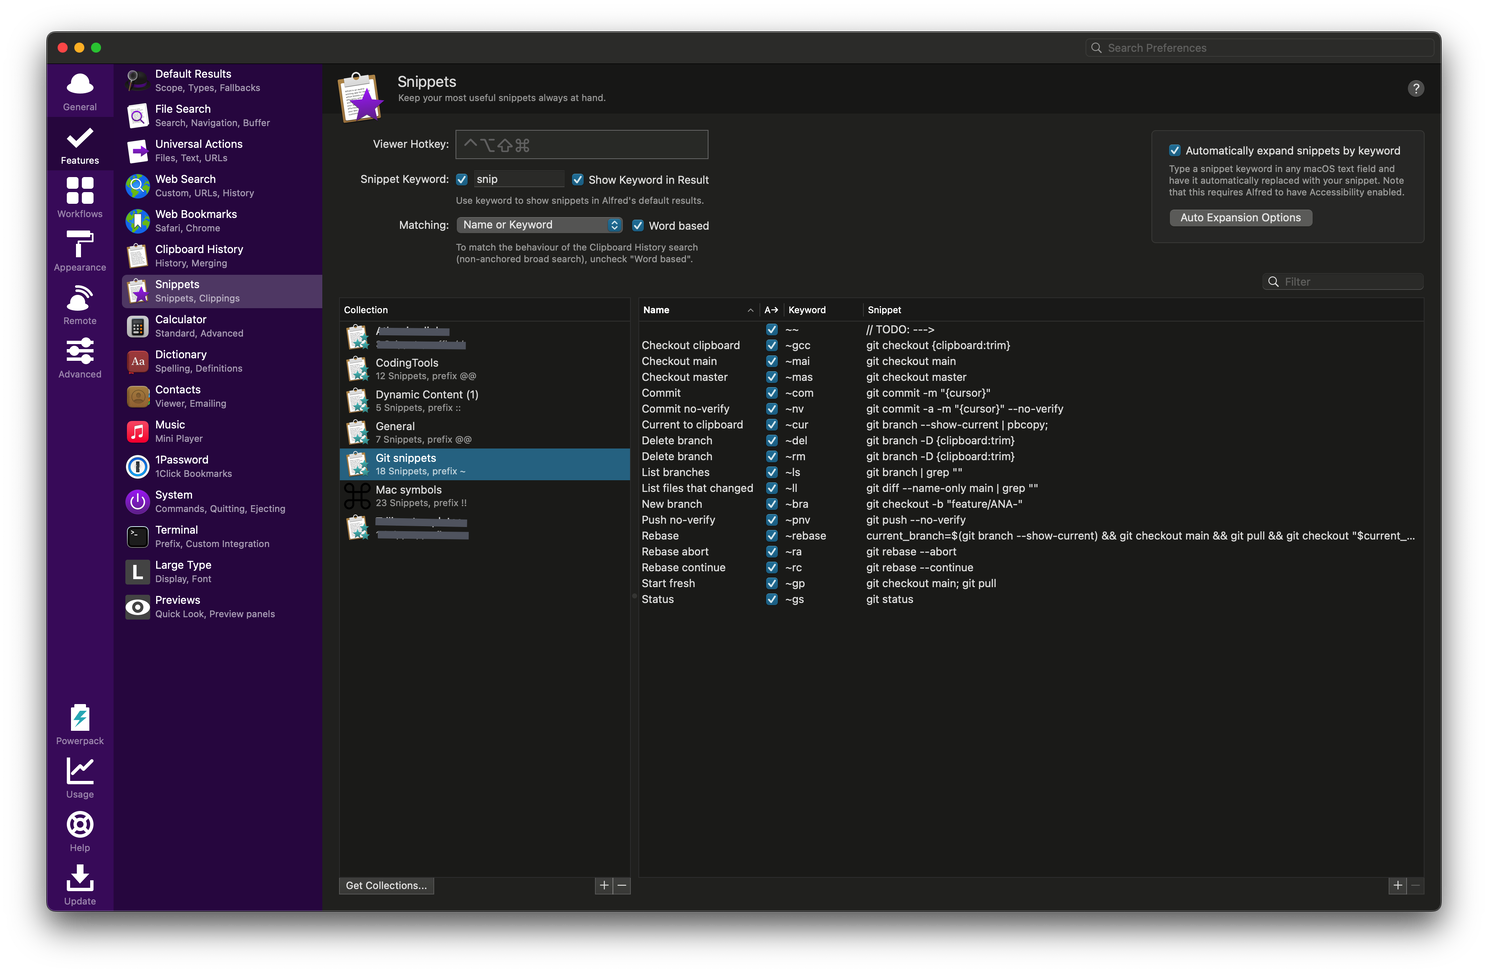
1 - List all branches
I don’t know about you, but I always get tripped up using “ls” when I want to list branches. Plus, the standard git branch command locks you in interactive mode. Solved by using:
~ls -----------------------> git branch | grep ""2 - Clean up my local branches
When the branch list gets too cluttered, it’s time for a clean-up. I start by listing all branches, copy the target branch name to the clipboard, and then use my delete snippet.
Just like with the list command, I tend to think of “rm” from bash, so I’ve added both rm and del alternatives, pulling the branch name from the clipboard:
~ls           ----------------------->         git branch | grep ""
~rm           ----------------------->         git branch -D feature/TICKET-123_test_fix
3 - The basic commands
First, I update to the latest main branch. Then, I create a new branch with my project convention, setting the cursor to start typing the branch name directly.
I use familiar commands to check status, commit, and push. Sometimes, I skip git hooks by adding —no-verify, so I’ve added those snippets as well:
~gp           ----------------------->         git checkout main; git pull
~bra          ----------------------->         git checkout -b "feature/TICKET-"
~com          ----------------------->         git commit -m ""
~nv           ----------------------->         git commit -a -m "" --no-verify
~pnv          ----------------------->         git push --no-verify
~gs           ----------------------->         git status
4 - Rebase like a pro!
This one’s a lifesaver! Typing just “rebase” switches to the main branch, updates it, switches back to your current branch, and rebases, then pushes the new version to the remote repo. For conflicts, I have quick commands to abort or continue:
~rc           ----------------------->         git rebase --continue
~ra           ----------------------->         git rebase --abort
~rebase       ----------------------->         current_branch=$(git branch --show-current) \
                                               && git checkout main && git pull \
                                               && git checkout "$current_branch" \
                                               && git rebase main && git push --force
5 - Switching branches with ease
To quickly switch contexts, I first copy the current branch name to the clipboard. Then, I can either list all branches or copy a branch name from Bitbucket.
Using “gcc”, I quickly check out the branch in the clipboard and can switch back just as easily:
~cur          ----------------------->         git branch --show-current | pbcopy;
~gcc          ----------------------->         git checkout feature/TICKET-123_test_fix
~mai          ----------------------->         git checkout main
~ls           ----------------------->         git branch | grep ""
~gcc          ----------------------->         git checkout <previous>
~gs           ----------------------->         git status
Conclusion
And there you have it! With Alfred snippets, you can supercharge your Git workflow and boost your productivity.
What’s your favourite Alfred snippet or workflow? Don’t forget to check out my other post on Alfred to discover more ways to enhance your developer productivity: Boosting Developer Productivity: The Secret Sauce of Bookmarks + Alfred